Friday, 22 November 2013

New floor installed

The fitting of them new floor has been completed.
I was very surprised how well everything lined up.
Thanks to Joe for the great tips and shortcuts.
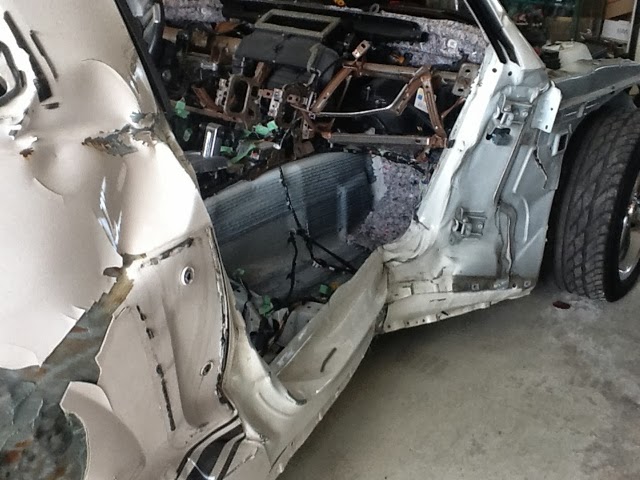
My next step is to remove the entire drivers side by removing each spot weld, this
way the panel can be salvaged to fix another Mustang. Once that is complete I will take a couple of pictures before removing the rest of the body.


Sunday, 3 November 2013

Damaged portion removed

I have now finished removing the damaged portion of the Mustang floor.
Removing the damage went pretty smooth, I forgot about a wire harness in the pillar
And melted a portion of the harness. Not the end of the world but something that will need to be repaired. Next step getting the new floor measured up and welded in place.


Sunday, 29 September 2013

New floor completed.

Thank you to everyone who has been following over the summer, I unfortunately did not get as much accomplished as I hoped. Before I get I to where I am today I would like to say thanks to all of the people who have helped with not only their expertise but the use of their tools, Blaine, Joe , Gord and Ken.
So today I have finished stripping the new floor and have it ready to be installed.
I was amazed at how many layers of metal and how Ford has put this together to make it structurally stable and safe. What I also found out was that the convertable floor has full frame rails where the Shelby and Cougar have unibody rails. My next task is to brace and support the Shelby then start to remove the damaged portion of the car.


Sunday, 14 July 2013

Replacing the Shelby floor

After evaluating the damaged floor and knowing that I would have to replace most of the supports with new ones as well as reinforce the rest, I have decided to replace the entire floor.
My search for a new floor did not take long as a local auto recycler had a great match.
A 2007 Mustang convertable that had a engine fire, so the floor body is in great shape.
I will be taking the floor out by removing each factory weld, before I started I thought this is going to take a long time, but once I got going using the spot weld removal tool the process moved along pretty quick. I have put in about eight hours and almost finished.


Friday, 21 June 2013

Time to move the Shelby.

Now that the Shelby is completely stripped I need to make sure that the car is at a place where it can be braced and supported as it will not be able to be moved once the main structural parts are being removed. I am unable to keep the car in my shop for the winter due to the amount of space needed so it is time to find it a new home. So today the car is moved to a new location. Unfortunately I do not have the space in my garage but I do have a space close to my house so it will be easy to get to and work on over the winter.

Monday, 10 June 2013

Decision time

After getting the Shelby and seeing the damage I was having second thoughts on taking it apart knowing that it was a rare car. I was going back and forth for weeks not knowing what to do, and of course all the car guys that saw it at my shop said you need to fix it. So after a lot of discussions with body shop mechanics and my family the decision was to give a new life to my Cougar.
Now the hard part, dismantling the car and selling the body parts not required.


Sunday, 9 June 2013

About the Shelby

After doing some research on the stats for the Shelby this is what I had found.
Year 2007
Make, Shelby GT 350 Mustang.
Engine 4.6 Liter.
Transmission 5 speed automatic with overdrive.
Production numbers, there were several different numbers posted so i am not sure that these are 100% correct.
Cars produced, 6000.
My car is number 5279.
There were only 491 automatics made as the car came standard with a 5 speed manual.